Cara Menginstal Aplikasi XAMPP
- Terimah kasih karena telah menonton, tutorial tentang bagaimana cara untuk membuat database dan merelasikan setiap tabel dengan menggunakan phpmyadmin
- Thanks for watching
tutorial on how to create a database and relate each table using phpmyadmin
- Baiklah sebelum saya menunjukan bagaimana cara saya menginstal aplikasi xampp, saya akan jelaskan sedikit sebenarnya, apa pengertian dari xampp dan apa fungsinya.
- Well before I show how I installed xampp application, I will explain a bit actually, what sense of xampp and what they do.
- XAMPP adalah software web server apache yang di dalamnya tertanam server MySQL yang didukung dengan bahasa pemrograman PHP untuk membuat website yang dinamis
- XAMPP apache web server is software that includes an embedded MySQL server are supported by the PHP programming language to create dynamic websites
- Fungsi XAMPP adalah sebagai server yang berdiri sendiri (localhost), yang terdiri atas program Apache HTTP Server, MySQL database, dan penerjemah bahasa yang ditulis dengan bahasa pemrograman PHP dan Perl.
- The function XAMPP is a stand-alone server (localhost), which consists of the Apache HTTP Server, MySQL database, and the translator's written in PHP and Perl.
Cara Instalasi XAMPP = How to Install XAMPP
Berikut cara instalasi XAMPP: = Here's how to install XAMPP:
1. Langkah pertama yang kita lakukan adalah membuka aplikasi xampp yang belum terinstal.
“The first step we did was open the xampp application is not installed.”
2. Klik 2 kali file installer
2. Klik 2 kali file installer
“Double-click the installer file”
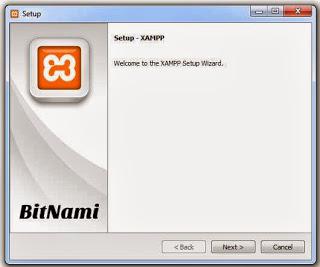
3. Setelah itu aka ada tampilan welcome to the xampp setup wizard dan klik next
“After that there will be welcome to the xampp setup wizard and click next”
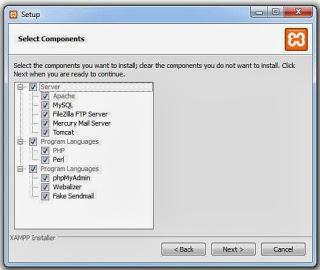
4. Kemudian Pilih komponen yang akan diinstal atau biarkan default lalu klik next
“Then select the components to be installed or leave the default and click next”
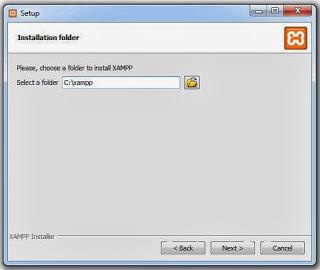
5. Setelah itu Tentukan lokasi instalasi dengan cara mengklik gambar folder lalu pilih tempat penyimpanannya dan klik next
“After that Determine the location of the installation by clicking on the image and select a storage folder and click Next”
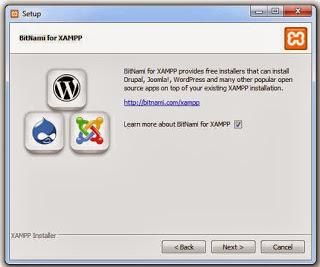
6. Hilangkan tanda centang pada "learn more about bitnami for XAMPP" atau biarkan tanda centang untuk info lebih lanjut tentang bitnami for XAMPP lalu klik next
“Uncheck the "learn more about BitNami for XAMPP" or leave a check mark for more info about BitNami for XAMPP and then click Next”
7. Setelah itu akan tampil proses penginstalan dimana xamppnya sebentar lagi akan siap digunakan
“After that will perform the installation process where the lamp will soon be ready for use”

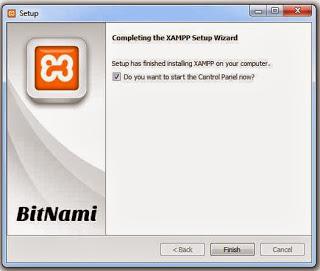
8. Setelah selesai akan ada tampilan completing the xampp setup wizard dan beri tanda centang pada kotak yang ada dibawah lalu klik finish. Fungsi dari tanda centang itu adalah pada saat kita mengklik finish maka aplikasi Xampp akan terbuka pada saat proses penginstalan selesai.
“Once completed there will be display xampp completing the setup wizard and tick the box below and click finish. The function of the check mark that is when we click finish then Xampp application will be open during the installation process is complete.”
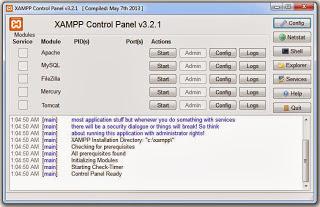
9. Berikutnya akan terbuka control panel XAMPP,klik tombol start pada bagian apache dan mysql fungsinya agar supaya xamppnya bisa terhubung dengan phpmyadmin yang ada di browser.
“Next will open the XAMPP control panel, click the start button on the apache and mysql xampp functions so that it can connect with existing phpmyadmin browser.”

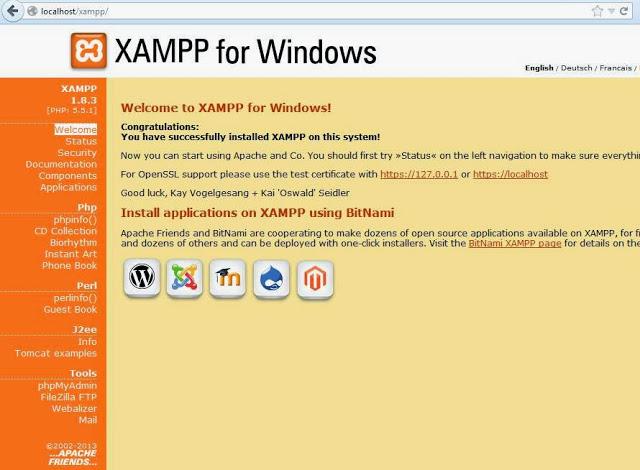
10. Buka browser lalu ketik pada addres bar "localhost", dan XAMMP siap digunakan
“Open a browser and type in the address bar "localhost", and XAMPP is ready for use”
- Baik sekian dari saya semoga tutorial ini bisa bermanfaat bagi semua orang. Terima kasih.
- Good so I hope that this guide can be beneficial for everyone. thanks.


0 komentar:
Posting Komentar